ScannerCast Software

Scannercast is a brilliant piece of software for broadcast your stream.
You can broadcast your stream via Audio only, or using one of the Uniden Scanners 396/996 they will also broadcast tags viewable in WINAMP.
Download file here
Configuring and Using ScannerCast™
What you need to know to get up and running fast, using ScannerCast.
Basic Configuration
To use ScannerCast, you’ll need to connect your scanner to your computer. Two connections are required:
- Connect your scanner’s control connection to your computer. Connect your scanner exactly the same way you do when you’re using scanner programming software (such as FreeSCAN, Win-500, Arc396, etc).
If you’re using a GRE scanner, even though your scanner is connected to your computer via USB, you’ll need to know which virtual COM port your computer is using to talk to your scanner. You can do this by going to Windows Device Manager (Control Panel… Device Manager) and looking at the entry labeled “Ports (COM & LPT)”. Find the port named “USB Serial Port (COMx)” (where “x” is a number). That “COMx” is the COM port you want to select in the Control box, below. - Connect the audio output of your scanner (where you’d plug in a pair of headphones) to your computer’s sound card input. If you’ve never connected your computer to your scanner’s audio before, and you have a choice, use the “Line In” (or just LINE) input to your sound card. The connection to your sound card might be on the front or the back of yoru computer. You may want to use a utility such as Windows Sound Recorder to verify that the audio from your scanner is getting to your computer. Don’t set the volume on your scanner too high! Typically, you’ll want to set your scanner’s volume about 1/3 to 1/2 of the way to max.
Basic configuration is done on ScannerCast’s main, Config, tab show below:
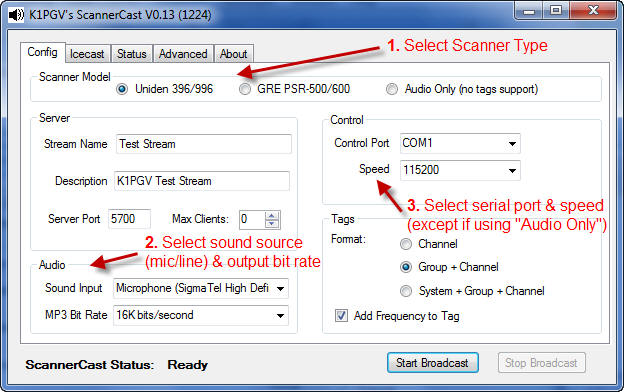
The steps required to configure ScannerCast for basic use are:
Step 1: Before doing anything else, select the type of scanner with which you’re using ScannerCast. ScannerCast only officially supports, and will automatically generate channel tags for, the Uniden 396/996 (and BCT-15), GRE PSR-500/PSR-600, and Radio Shack Pro-197/Pro-106 scanners. ScannerCast also supports other scanners in “Audio Only” mode. In other words, for scanner models other than those specifically listed, ScannerCast will only forward audio and will not retrieve, generate, or send tags.
Step 2: Select the audio input to which you connected your scanner, using the “Sound Input” box on this tab. This must match the input (sound card, LINE, or MIC) that you connected your scanner’s audio to. Also, select the bit rate that you’ll be using to transmit your scanner audio in the “MP3 Bit Rate” box. If you’re sending to Radio Reference, you almost always will want to set this to “16K bits/second” — If you’re only sending your scanner’s audio across a LAN in your home/office, you can try higher rates. Higher rates require more computer processing power and more network bandwidth. If you don’t understand all this stuff, just choose “16K bits/second” and you’ll be happy..
Step 3: If you’re not using Audio Only (no tags) mode, select the serial port that you’ve connected to your scanner’s control connection, in the “Control” box on this tab. If you’re using a Uniden scanner, you’ll also need to select the speed that matches the speed set in your scanner. Note that higher speeds are almost always better than lower speeds (I use 115200 for my 396t). If you’re using a GRE scanner, the speed is automatically set at 115200 and can’t be changed.
Next Steps:
Set the parameters in the “Server” box on this tab. Fill in a short name for your feed into the “Stream Name” text box. This is shown when somebody connects to your feed, and (depending on the player being used) when there’s no other tag being displayed. Put a longer description of your feed in the “Description” text box. This is shown in some players as the full description your feed.
To change the format of tags, you’ll want to make selections in the “Tags” box on this tab. The selections displayed in this box depend on whether you’re using a Uniden or GRE scanner (the example above shows the selections for Uniden). I recommend that you start with the middle radio button for “Format” — This is labeled “Group + Channel” (Uniden) or “TSYS or SLIST name + TGRP/CONF” (GRE). Check the “Add Frequency to Tag” check box to have the frequency (in parentheses) added to the tag display.
http://www.k1pgv.com/SCConfig.html goto this link for information on sending stream to Radio Reference.